Build your own house – part 3 – textures

In the previous parts, the setup and Gmax, I’ve showed you how to build your own house or another object of your choice. And I’ve told you which steps to take to view your results in Microsoft Flight simulator 2004. The result is a building in one color which doesn’t have the realistic effect you wish for. Textures are the solution for this. Textures are just images in bmp (bitmap) format, like these exist for a long time in Windows. To be honest, some extra features are added to the bmp format you will use like a performance feature. The tool you will use for these extra features is free and probably already on your system. The textures are glued on your building and there it is: as real as it get.
Photo and film material
The base for a texture is a good photo or a snapshot from a video. A few years back it was pretty hard to get a nice quality picture on your computer. First you had to get your photo’s from a photo shop and then use a scanner. This resulted in a difference in color and quality loss. And not to forget the situations where you afterwards discovered the exposure was not good enough or you took the photo from a wrong spot. If you worked with a video camera you needed an expensive video capture card and of course a big wallet. At the moment there are a lot of affordable digital camera’s and camcorders with accompanied software. Within short moments the needed material is on your computer with a good quality.
Experience will teach you what a good base is for a nice quality picture, but I will give you some hints:
- You’ll get the most beautiful colors in the summer when the sun is high in the sky. Less change on clear pictures are the ones after sunrise and before sunset. Of course you can get nice pictures in the winter or during rain, but you have to be more precise about the moment of the day. With the sunset in the back you will end up with dark pictures most of the times.
- In case of a camcorder, keep the camcorder still for one or two seconds at the spots from which you need a photo. Hold your breath. Otherwise the snapshots will be blurred by the movement.
- Try to get straight in front of walls of the building, horizontal and vertical, which later on keeps editing in a photo editing application to a minimum. Take a distance to the building so you will get a good quality picture, but you’re not at the foot of the building which results in disfigured picture. Example: if I take a picture of a canal house, I will take the picture from the other side of the canal.
- Try to avoid obstacles like trees, cars, lightning bulbs, etc. Especially in front of important parts of the object. One step to the right or left can make a lot of difference like shooting the logo of the building. The winter is a better time to shoot photo’s if you want to get rid of trees. In the photo editing application you can make a lot of corrections, but it will save time to avoid these obstacles.
Some buildings are not allowed to be photographed or filmed, especially in this time. In case of doubt, ask for it and explain what you’re doing. If a guard sent you away, you can try to contact the right persons to take your pictures anyway. Sometimes this will take some effort, but it can be done with a little patient and determination
Other ways to get pictures:
- Search on the internet. Be aware of copyrights and ask author in case of doubt.
- Have a look at the standard set of textures of Microsoft Flight simulator
Creating textures
You can start creating textures if you got the base material on your computer. Ninetynine of a hundred times a picture is not useable the first time. You’ll need a photo editing application like Photoshop, The Gimp or Paintshop. The Gimp is a freeware package and a good alternative for both other packages. Everybody has it’s own preferences and use some favorite tools within that application. My favorite tools:
- Skew. Most of the times it’s not possible to take enough distance from the building or get straight in front of it. To straighten a picture I use the skew tool. If you don’t straighten the picture and put it in Flight Simulator, you’ll see a crooked wall. Arno Gerretsen wrote an article about this issue on www.SceneryDesign.org. in combination with The gimp.
- Magic wand / clone tool. With this tool you can copy a part of the picture on another part of the picture by making strokes. For example, if a lightning bulb is in the way and that part needs to be covered with the material you see next to the lightning bulb, you use the Magic Wand tool. In Photoshop you alt-click next to the lightning bulb and then paint over the lightning bulb. The result is quite natural.
- Copy parts of the picture. A fast en effective way is by simple copy good parts a picture on parts which have obstacles in front of them. Imagine a window and a part of that window is covered with bushes. Copy the part of the visible window on top of the part which is covered by the bushes. This creates a complete visible window.
Gmax can manage Photoshop (psd) as well as bitmap (bmp 24 bit) textures. Save the texture in one of those formats. If you use Photoshop, save the textures in Photoshop format, because it’s pretty easy to manage transparency.
Scale of a texture
Which size is right for a texture? On first sight you think: “The bigger the better.” But a bigger texture means less framerate. This doesn’t matter if you make one house in the middle of a country side with no other objects in it’s surrounding. But if you have to deal with a lot of objects on a small area like Schiphol you have to make compromises between detail, framerate and the total download of your project in case you want to distribute it on the internet.
The biggest texture size I normally use is 512×512 pixels and in particular cases 1024×1024 pixels. Take an historical building as example. If you put this on a texture of 128×128 pixels you won’t see much detail. A texture size of 128×128 pixels is a fine for a repeating texture of a few floors of a tall building. Beside the size and level of detail you choose you have to deal with standard textures sizes. A side of a texture should be a power of 2. Correct measures are 256×256, 512×128 and 256×64. A texture doesn’t need to be a square.
Image a picture with a logo on a building and a picture with the whole front of the building. If you make a texture of only the front of the building you won’t recognize the logo in Microsoft Flight simulator Probably you think: “I put both pictures in one texture so the logo will get much detail and the rest less.” But unfortunately the scale of both parts is completely different which results in a blurry logo. The solution is simple. Put both pictures on a separate texture. Rule of thumb to put parts with about the same size on the same texture. Some people even count the pixels compared to each meter. I don’t have the patience for that.
Placing the textures on objects in Gmax
Now the textures are ready, they can be placed on your building. Like part two of “Build your own house” the placement of the texture is described in the tutorial which is part of the Gmax gamepack SDK. Have a look in the installation directory of Gmax where you can find the directory gamepacksfs2004doc. Open the document gmaxSceneryTutorial.doc. The placement of textures is described from page 18. The way described in the tutorial is pretty complex and can be done much easier. Try the method below first and afterwards the method described in the tutorial. Together this gives a complete picture of placing textures. Download both textures which I used in the samples below, so you can compare your own work with the samples.
Basic steps
During placement of the first texture I always follow a standard procedure to prevent strange behavior later on. When you’re more experienced you will discover other ways to prevent these strange behaviors, but until then I suggest to follow the standard procedure below.
- Start Gmax and open your creation.
- Make sure the object is converted to editable mesh (see part 2) and make sure the whole object is selected and not only one punt or poly.
- Start the Material Navigator by clicking the button:

- Select File System on the left side and browse to the map where you saved your textures.
- Click once on the texture you will use the most on the object. Click and drag the texture on the object. If you didn’t clicked the texture first, there is a big chance the wrong texture is now on the object. The result is probably not what you expected but just follow the next steps.
- Close the Material Navigator.
- Select the Modify tab at the top right of the window (see part 2).
- Click the dropdown menu modifier list and select UVW map.
- Select mapping for box in the parameters section.
- Right mouse click on UVW Mapping in the modify stack en choose Collapse All.


UVW Mapping
What is UWV mapping exactly? Image there’s an invisible frame around the object. The coordinates of the points of that frame are expressed in U, V and W like the points of the object itself are expressed in X, Y and Z. The textures are not glued on the object itself, but on the frame. The power of this feature is the independent movement of the frame against the object like rotating, moving, increasing, decreasing, etc. Let me demonstrate this feature with an example:
- Create a new box en with the standard procedure above except for the last step Collapse All.
- Click the plus sign of UVW Mapping in the modify stack and then click Gizmo. Yellow lines appear around the object. This is the frame I talked about.
- Now you’ve selected the word Gizmo select the Move tool
- Try to move the object. And what happens? Only the texture is moved instead of the object. This happens because the frame (de gizmo) is being moved on which the texture is attached.
- Try for instance Rotate or the Scale tool . Click the button Reset (at the bottom of the Modify tab) to undo all changes to the gizmo.
- In the Modify tab you see the parameters U Tile, V Tile and the options Flip. Play with these options and you’ll see repeating a texture can be done very precisely. I never understood the purpose of W Tile because nothing seems to change.
- Other kind of mappings can be selected as well. In the example above you choose Box, but its possible to wrap the gizmo (frame) around in other kind of shapes. Click the button Reset and make sure the word Gizmo is selected to see the beautiful result if you change the mapping. Try for example the mapping Spherical. You will see the mapping Box is your most used mapping.
- Don’t forget to choose Collapse All in the Modify stack at the end.


 or the Scale tool
  . Click the button Reset (at the bottom of the Modify tab) to undo all changes to the gizmo.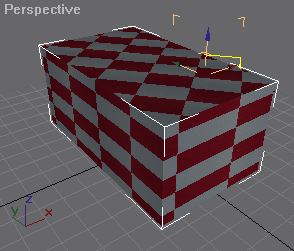
This image is the result of a few clicks and see the repeating effect. But what if on one side the texture should be repeated four times, on another side the same texture should be repeated nine times and a total different texture should stick on another side. Now it’s getting exciting 🙂
Editing textures per poly
The answer is to work on each side (poly) of the object. Let’s practice:
- Create a box by following the basic procedure with same texture, so you end up with a box with two red and two with squares on each side. Again, don’t forget collapse all at the end.
- Enter Poly mode (see part 2, editable mesh) by clicking the plus sign in front of Editable Mesh in the Modify stack and then Polygon.
- Select a side.
- Select UVW Map from the Modifier List (dropdown in Modify tab). Editing of the texture is now focused on the poly.
- Choose Face of Box as mapping parameter.
- Put U Tile on 2 and V Tile on 5.
- Right mouse click on the Modify Stack and select Collapse All. It’s important to do a collapse all after editing a texture on a poly, otherwise there’s a big chance you can’t export your work or see strange texture effects.
- Select the upper poly.
- Open the Material Navigator and select File Systems.
- Click once at another texture and click and drop that texture on that poly. Close the Material Navigator.
- Select UVW Map again from the Modifier List, select gizmo by clicking the plus sign in front of UVW Mapping in de Modify stack. Select the Rotate tool and turn the gizmo a little.
- Put V Tile on 2 en do a Collapse All again. I think I made my point about Collapse All 😉
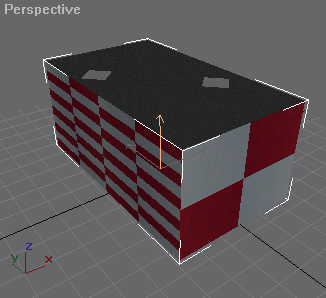
As you can see, most textures can be put in the right place with this method.
Placing a texture with UVW Unwrap
There’s another method to place a texture on a poly with high precision. You will use the modifier UVW Unwrap for this. An example is self explanatory and easier than a lot of words. But why should I explain it myself if that’s already done in the Gmax scenery tutorial gamepacksfs2004docgmaxSceneryTutorial.doc in the installation directory of Gmax. It is explained in detail from point 22 until 42 in the chapter Creating and applying textures. The fun part of the method UVW Unwrap is the creation of strange texture shapes on a poly, but at the same time this is the tricky part of this method. Time will teach you.
Make textures suitable for FS
The textures you made are not yet suitable for Microsoft Flight simulator. A little step need to be made for which ImageTool is used. ImageTool is free for use and included in the Gmax Gamepack SDK. Have a look in the gamepacksfs2004 ools directory in the installation directory of Gmax. Here you will find imagetool.exe which converts your texture to a so called DXT1 format of with mipmaps included. DXT1 is a certain compression format like jpeg, gif, etc. Mipmaps are more images inside one bitmap file. An example makes more clear than a lot of text, so follow the next example:
- Start ImageTool (a shortcut will make your life easier).
- Open the texture you made. Image tool supports several formats like bmp and psd (Photoshop) Be aware of the information on the right side of ImageTool, especially Format and Mip Levels.
- Click in the Image menu on Create MipMaps. The size of the bmp will increase a little.
- Click in the Image menu on Format and then select DXT1. The size of the bmp will decrease a lot without losing much detail.
- Save the file as a bmp in another than your original texture, for example in the directory where you put you scenery in the Flight simulator. This is particular the case when your original is a bmp also! By converting the bmp to DXT1 format some information is lost. If you want to change something later on you want to edit the original files and convert it again after the change to keep the details.
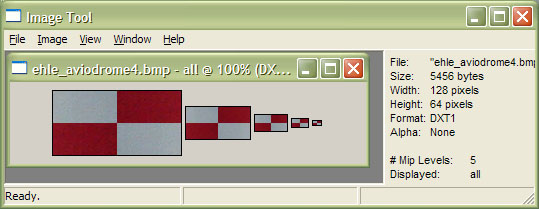
The image above show clearly what mipmaps are. How does Microsoft Flight simulator. use these? Imagine an object on a big distance. In real live you won’t see all details from such a distance. So it’s a waste of the processor and graphical card to draw such a big texture with all its details. In the texture above you see 5 mip levels. If you are at a big distance from the object, the smallest mip level is used, which already gives you good impression of the object. The closer you get a bigger mip level is used. A simple action in ImageTool results in a higher framerate.
If you want to convert several textures at once, you can use the command line option of ImageTool. Start a command prompt and change directory to the directory of ImageTool. Type the following command: imagetool -help. A popup window will show you all available parameters. By using wildcards like * it’s possible to convert whole directories at once.
Night textures and transparent textures
And how does your house look at night in Microsoft Flight simulator.? Pretty dark probably. By environmental lightning and lightning of the house itself it looks different in real life. And image you want to texture the inside of your house and want to see that from the outside. Both options can be solved by making night textures and transparent textures. Both subjects will not be part of this tutorial, but are well described at a forum on www.SceneryDesign.org. If you want to make transparent textures with Photoshop, the article How to make an alpha channel with PhotoShop is a good tutorial.
Conclusion
This tutorial together with the two previous parts, the setup and Gmax, give you a complete set of information to create you own house and show it to your co-vitual pilots in Microsoft Flight simulator. If you got the “build virus” like me, than I’m afraid it won’t stop with your own house…
Coming up
The last part of Build your own house will cover:
- what to keep in mind when you build more objects. The tools we will use for the purpose are Library Creator XML and ObPlacer XML, both written by Arno Gerretsen, a team member of the NL2000 team.
Have fun

Erwin Horjus – NL2000 team